Here’s something useful for all of you participating the Invitational:
Quick and simple guide for photographing miniatures using your phone.
Modern phones are ridiculously good at taking pictures I use old iphone 6s and I think that the newer versions are even better for miniature shooting with their dual optics and stuff.
The setup:
You dont really need much to take good photos of your miniatures. The technology has come a long way making the process smooth and easy.
You still need to master few things though.
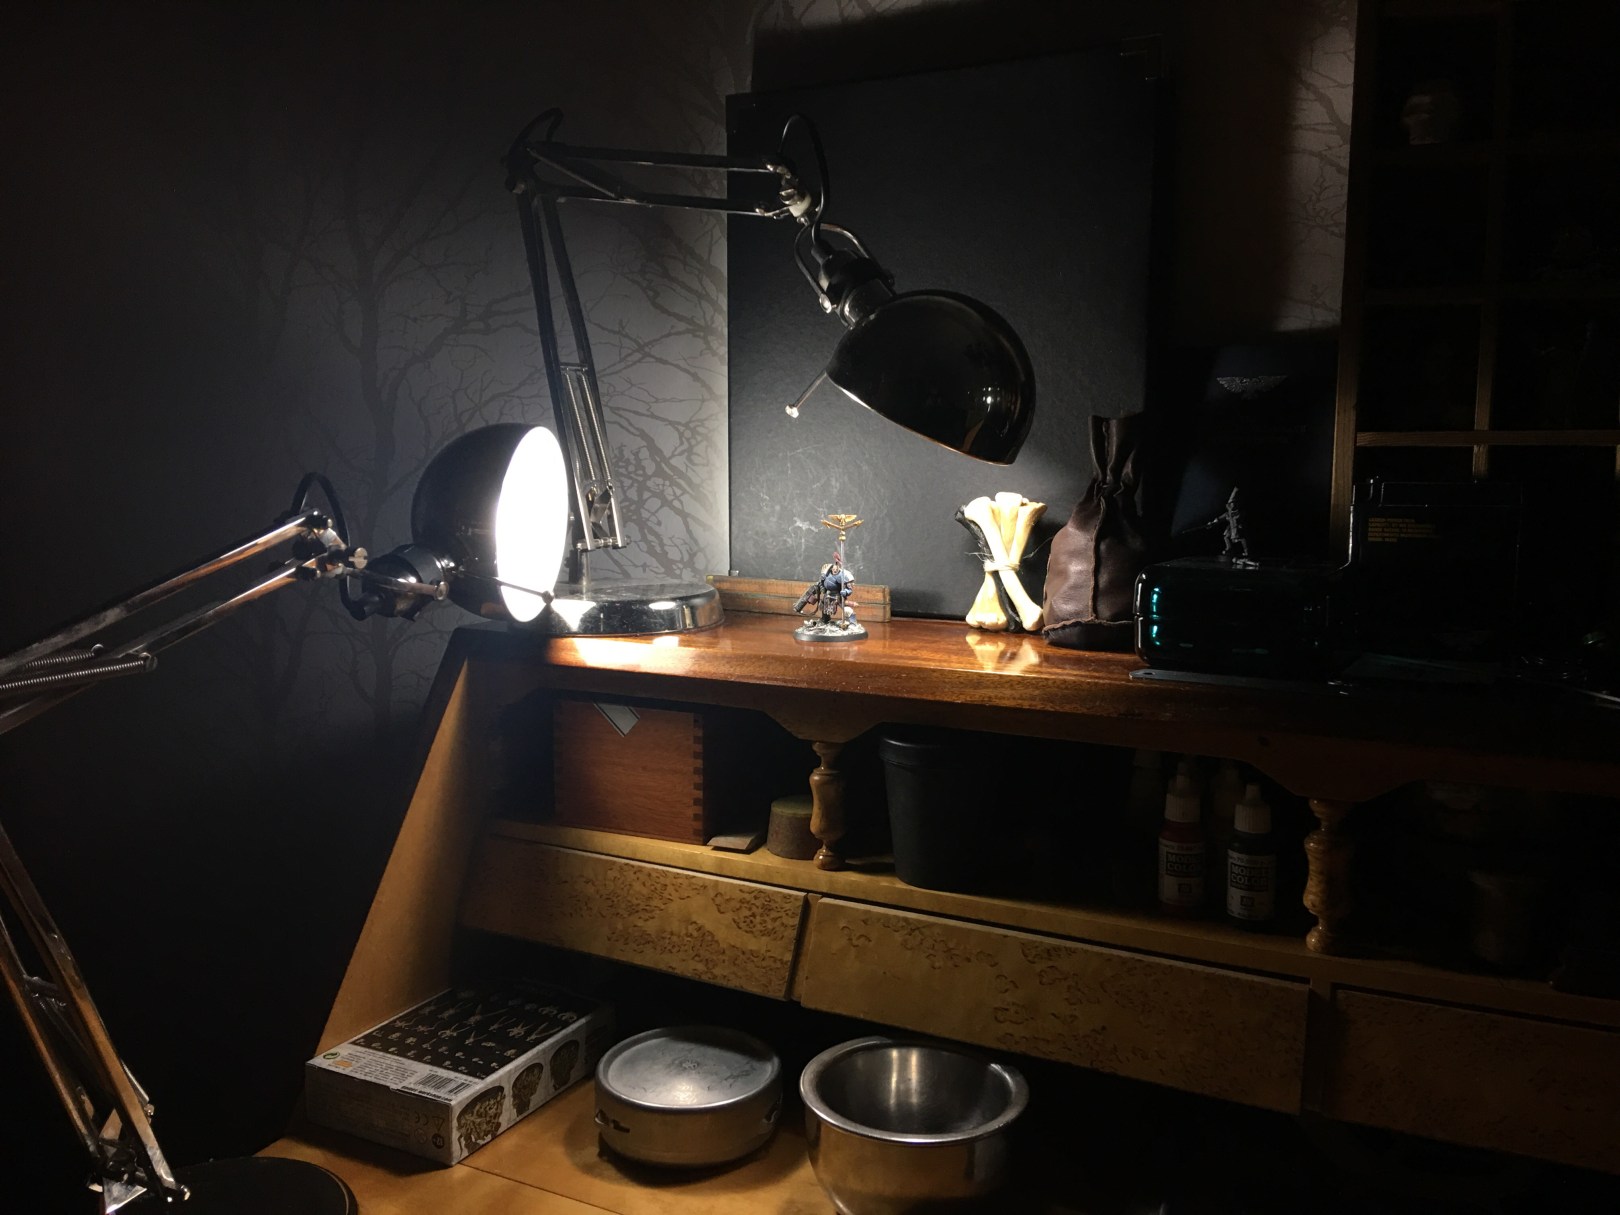
First you need to have good place to shoot.
I take my photos using my desk as a background. This is quick because I don’t really need to setup anything for the photo session. Some people use light boxes but I personally think that they make the pictures too sterile.
Use your imagination when choosing the place to shoot.
Dark background usually works better than a white one. I use simple Ikea box lid. 

Lighting is important. I would advice you not to use daylight, since its very unpredictable: it constantly shifts and its tone changes depending on the season and time of day. Here in the north we really don’t have natural light anyway so its not even a choice for me.
You need two lamps with daylight bulbs. One is used as main light, while the other is used for complimenting and removing unwanted shadows.

Heres an example of the differences of using two light sources instead of one.
A single light source can sometimes leave unwanted shadows that hide details:

Those shadows are now removed by adding a secong light source:

Don’t get me wrong, you shouldn’t try to eliminate all the shadows. Just the darkest ones. You need shadows to make a good photograph. My advice here is that experiment with the lighting, try dramatic light of very dim one. You can easily change the mood of the photo by slightly changing the place of the lights.
Now it’s time to grab your phone and start shooting. Place your miniature against the backdrop, don’t try to take the photo too close, the optics will distort the proportions if you are focusing too close. Take your distance and crop the final result when you are ready.
Focus on the mass of the miniature, or preferably the face. Then, by using your finger slide the exposure curve down until you see that no part of the picture is over exposed.

Keep your light sources close to miniature. So you have enough light in your picture, don’t be scared that it first seems that the whites in the picture will over expose, you will easily fix this by dragging the exposure curve down until you are happy with the result.

Picture 1 with no exposure adjustments:
 picture 2 with exposure adjusted. See the difference?
Here we see how the sleet in the base was first over exposed because of the high contrast.

Here it is fixed and the difference is huge.
Once you are happy with the result you can crop the picture to your taste.

Simple and easy and you can do it too!
Remember that photography is a form of art. Tell stories with your photos, don’t just take them, make them!

What a moody workstation 💀
LikeLiked by 1 person
That’s really useful. I do struggle with photos but have only been using a single light. Time to try adding a second one. Thanks for the tips! 👍
LikeLiked by 3 people
Great article Mikko. As you say, the main issue is lighting and this can be a big subject on its own. Assuming we just consider artificial lighting, like you’ve used here, one thing to remember is that you are always mimicing natural/outdoor light, because that is what humans have evolved to see. So your main lamp represents the sun and the second lamp represents sunlight reflected off the ground or other surfaces, bouncing light into the shadows. That is why for example the fill-in lamp should always be weaker than the main lamp. A common mistake is to use two lamps at the front at 45 degrees and equal brightness – that never happens in nature and hence it can create odd looking shadows. Another thing to consider is that you will get a different quality of light on the subject depending on how far the lamp is away – if it’s close you will get a broader light (e.g. from a window on an overcast day), whereas if it’s far away you will get a narrow, point light (e.g. from the sun on a cloudless day). Have fun!
LikeLiked by 2 people
Thank you very much, very useful. I just got myself a new phone and will try this very soon.
LikeLiked by 1 person
Very useful, thank you!
LikeLiked by 1 person
Great write up. I think capturing the right image of a mini is just as important as the mini itself. I don’t like light boxes for the same reason, too sterile. I like to do insitu photos mostly. It’s good fun and I tend to get a better response from people when I make more of an effort
LikeLiked by 2 people
Interesting article, a thoroughly good read. I would make a few adjustments to this however. I’m both a Photographer and have been a Lighting technician for theatre. Just a few pointers (sorry to be ‘that guy’).
You’re actually probably better off going with 3 points of light. Two from front or slightly above angles like you have here, and then another from behind. This gives the subject more definition and makes them look more three dimensional. It also then eliminates any harsh rear shadows that may be generated. The models you’ve used here thankfully are very forgiving, and don’t suffer from awkward areas to reach with the light. However, anything like the Ogroid Thaumturge, for example, who covers a portion of his body with an arm, will be tricky to light properly and then your camera will have trouble focusing.
Regarding the background, controversially, a white background will actually reflect the light back onto the model and will reduce harsh rear shadows a tad. The black looks more professional, true, but black eats light and means your rear lighting suffers.
I know you’re only using a phone, so can’t expect SLR level results, but having more light will give your photos a better ambience regardless. For anybody reading my massive response who owns an SLR, the larger the aperture, the better, because the camera has a larger focus area. You’ll notice this on the Cultist, your gun barrel is a little out of focus due to the aperture not being large enough. Again though, phone.
Once again, sorry to rain on the parade, but I’m hoping this information helps.
LikeLike
No broblem at all! Nice to hear your professional angle and thoughts about this subject👌🏻 Third light would, without a doubt be good addition to my setup too. The point of this little article was simply give other hobbyists struggling out there a simple set of easy tricks to improve their game and also show how good photos you can get with your phone if the lighting is set about right.
LikeLiked by 1 person
I took a few shots of my Deathrattle models a few months ago. You can see here what I mean about awkward angles etc, especially on Arkhan and Neferata. Two lights were just not enough to light them up properly. Also with the bulbs, that other guy is right, being able to dim the lights by any means will create a much more dynamic exposure. Albeit, I think my shots are a little dark, but hey-ho.
https://www.flickr.com/photos/dkirbyphotos/albums/72157688576314995
LikeLike